To CAN or not to CAN, that is the question…
Hello all!
In this short post, I will share my experience setting up CAN communication within the esp-idf.
Why CAN?
While I wanted to utilize the CAN bus for a while, I recently got my hands on an Odrive Micro motor controller. As this driver can only be interacted with through the USB interface or CAN bus, it is finally time to set it up.
CAN is a communication protocol that utilizes two differential signals (CAN LOW and CAN HIGH) to transmit data. This differential signal enables a better resistance to electromagnetic interference as if there is an inducted error, it usually affects both wires. As the difference in potential of both is the deciding factor for a transmitted bit, if both are affected equally by distortion, the signal can still be transmitted without issue. This is a big factor why this protocol is commonly used in automotive applications (although nowadays there are already new standards in use like FlexRay).
How to use CAN within the ESP-IDF framework:
In the Espressive system, for some reason, the CAN related functionality is called TWAI (Two-Wire Automotive Interface). As this post is just a really simple introduction to getting a working communication going, I strongly recommend reading through the official documentation. Here, ISO11898-1 is simply the CAN standard, no idea why they did not mention “CAN” once in their documentation.
If you are completely unfamiliar with programming through the esp-idf, check out the official guide. This article assumes you have already set up a basic project structure. Also for convenience, if you’re a VSCode user, I recommend you to utilize a development container setup similar to this devcontainer.json and Dockerfile:
{
	"name": "ESP-IDF QEMU",
	"build": {
	  "dockerfile": "Dockerfile"
	},
	"customizations": {
	  "vscode": {
		"settings": {
		  "terminal.integrated.defaultProfile.linux": "bash",
		  "idf.espIdfPath": "/opt/esp/idf",
		  "idf.toolsPath": "/opt/esp",
		  "idf.gitPath": "/usr/bin/git"
		},
		"extensions": [
		  "espressif.esp-idf-extension",
		  "espressif.esp-idf-web"
		]
	  }
	},
	"runArgs": [
	  "--privileged",
	  "--volume=/dev:/dev",
	  "--volume=/etc/timezone:/etc/timezone:ro"
	]
  }
ARG DOCKER_TAG=latest
FROM espressif/idf:${DOCKER_TAG}

ENV LC_ALL=C.UTF-8
ENV LANG=C.UTF-8

RUN apt-get update -y && apt-get install udev -y

RUN echo "source /opt/esp/idf/export.sh > /dev/null 2>&1" >> ~/.bashrc

ENTRYPOINT [ "/opt/esp/entrypoint.sh" ]

CMD ["/bin/bash", "-c"]
This setup ensures you use a consistent esp-idf setup and have the necessary tools installed. Also, note that –volume=/dev:/dev will pass all USB devices through into the container, so that they can be accessed for flashing. The configuration in Windows might look different, but not sure how it should be set up in this case.
With that clear, let’s look at how we can test our CAN communication.
Hardware Setup
We will set up a basic CAN 2.0 example showcasing the communication between two ESP32-WROOM-32 DevKits. To follow along, you will need:
- 2x ESP32 DevKits (although any other ESP-IDF-supported MCU will also work)
- 2x CAN transceiver (I use the SN65HVD230 CAN Board)
- 2x USB micro to USB A cables
- 1x Breadboard
- 1x LED
- 1x ~100Ω current limiting resistor
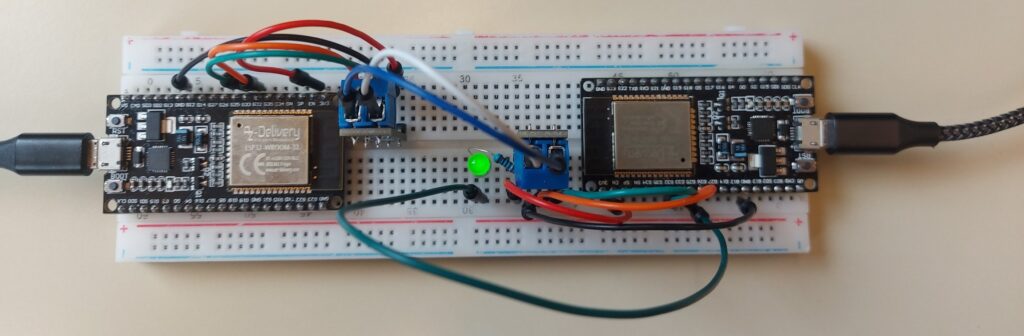
The two images below show how all these components should be connected. Note that in general, the CAN bus uses a 120Ω termination resistor on each end of the bus line. Although not necessary in our simple setup, this is needed to reduce the reflections of high-frequency signals in the transmission lines and should still be followed (see this video for more info on reflections). In our case, the used transceivers already have this termination resistor built-in, so no need for an additional one. If you are unsure if your system is set correctly, you can measure the resistance between CANL and CANH. The reading should be around 60Ω.
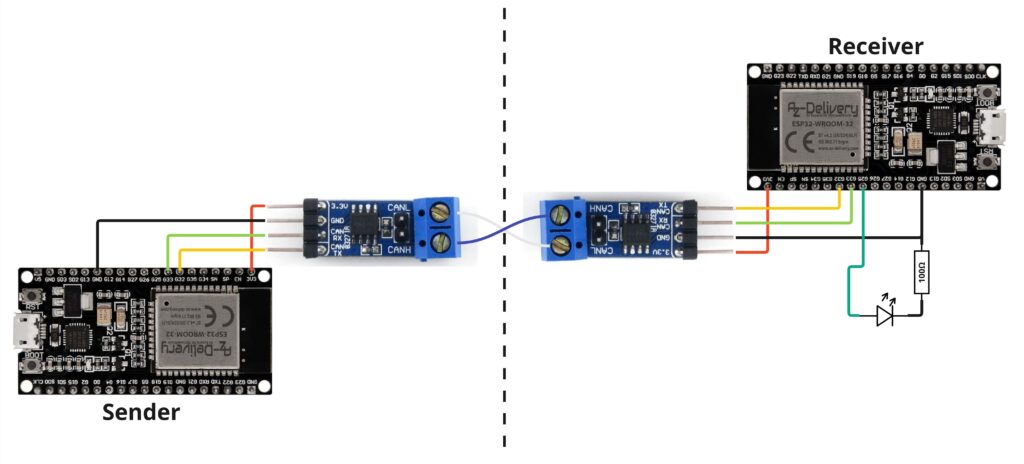
To provide a simple demo, we also connect a LED to pin 25. To not damage the LED, a current limiting resistor with a value between 100Ω and 400Ω should be put in series. Connect the CAN trancceivers to 3.3V and GND of the respective ESPs and for each side the RX signal to pin 33 and TX signal to 32. Note that the pins can be connected to any GPIO, but then the defines in the code need slight adjustment.
To flash the code:
- clone the provided GitHub repo:
git clone https://github.com/Geibinger/CAN_ESP32_Example- Open the project as VSCode DevContainer (just open the project in VSCode and click on the popup. If no popup shows up, press “CTR+P” and put in “> Dev Containers: Rebuild and Reopen in Container” so that all dependencies are installed
- Use the following command to open menuconfig, and make sure under “CAN Example Configuration”, the target is set to “sender”
idf.py menuconfig- Connect the first ESP and execute the following line to build and flash the sender code:
idf.py build flash- Now again configure the target to “receiver” and flash the code to the receiver.
- Once both ESPs are flashed and connected to your PC, open the monitor using “idf.py monitor -p <your_port>” for both microcontrollers and their respective ports. (you can check on which port they are connected by calling “ls /dev/” and checking which open up once they are connected. For me it is /dev/ttyUSB0 and /dev/ttyACM0.
- Now on the sender monitor, you can put in “1” or “0” which then makes the sender send a CAN message to the receiver. The receiver then switches the LED on or off and prints the received message.
So this is how a basic communication can be established in TWAI.
As said above, the benefit of CAN is that it is a differential signal. I connected my Oscilloscope to both CANL and CANH of the transceivers and this is the result:

Here we nicely see that one signal mirros the other. The good thing of this is that for electromagnetic influences (e.g. a motor running next to the wires), the signal on both lines is distorted equally. So the difference should roughly stay the same, and the data can still be received.
That’s it for now. If you have any questions, feel free to put them in the comments.
Goodbye and thank’s for the fish!