This tutorial should serve as quick starting guide on how to setup your Rock board. In the case of my Roboost project, I use the Rock 5B to run the Roboost-Cerebrum nodes within the Docker environment. In this post, I wrote down the steps I used to setup my environment to maybe spare someone out there the issues I faced during the setup.
Components for the Rock 5B Setup
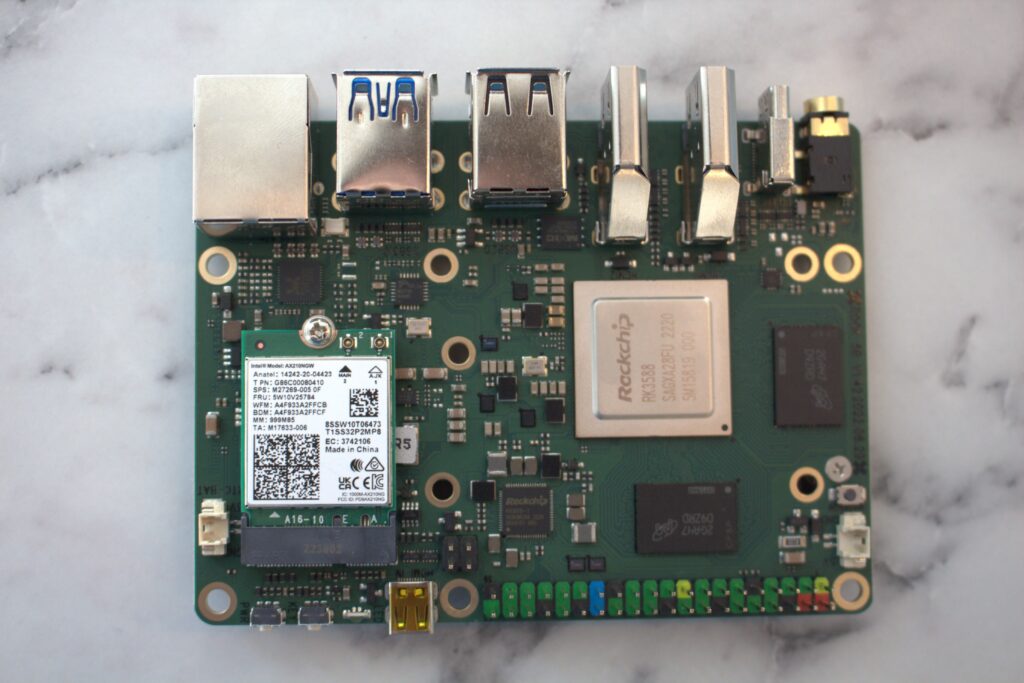
For setting up the Rock 5B, I used the following components (as seen in the images):
- Crucial P3 500GB M.2 PCIe Gen3 NVMe Internal SSD
- AX210NGW WiFi Card, AX210 NGW WLAN Bluetooth 5.3 Card
- SanDisk Extreme microSDXC UHS-I Memory Card 128 GB
- 65 W USB C Power Supply Charging Cable for Lenovo
Note that in terms of power supply, the Rock 5B needs to be powered using a USB-C connecter with PD capabilities. For testing purposes I use the Laptop charging cable, but on the robot I’m using this car charger jack, which can be supplied with 12 – 24 V and supports the needed PD features. I’m not that happy with the current power supply setup for this board on my robot, if you have other suggestions, please leave a comment down below.

Step 1: Preparing the Software Environment
- Downloading the Operating System:
- Visit the Radxa Build for Rock 5B Releases.
- Download
rock-5b_ubuntu_jammy_cli_b39.img.xz. - Use Balena Etcher to install the image on an SD card.
- Initial Login and Configuration:
- Login with radxa radxa via SSH.
- Change keyboard layout with
sudo apt-get install console-data
- Downloading and Writing the Image to SSD:
- Download the image again for SSD installation:
wget https://github.com/radxa-build/rock-5b/releases/download/b39/rock-5b_ubuntu_jammy_cli_b39.img.xz - Check if SSD is detected with
sudo fdisk -l - Write the image to SSD:
sudo xzcat rock-5b_ubuntu_jammy_cli_b39.img.xz | sudo dd of=/dev/nvme0n1 bs=1M status=progress
- Download the image again for SSD installation:
Step 2: Clearing and Updating the SPI Flash
- Clearing SPI:
- Download
zero.img.gzfor clearing SPI:wget https://dl.radxa.com/rock5/sw/images/others/zero.img.gz - Check the integrity with
md5sum zero.img.gzIt should report back
ac581b250fda7a10d07ad11884a16834 zero.img.gz. - Uncompress with
gzip -d zero.img.gzand verify
md5sum zero.imgIt should report back
2c7ab85a893283e98c931e9511add182 zero.img.
- Download
- Bootloader Update:
- Download the latest bootloader:
wget https://dl.radxa.com/rock5/sw/images/loader/rock-5b/release/rock-5b-spi-image-gbf47e81-20230607.img - Verify with
md5sum rock-5b-spi-image-gbf47e81-20230607.imgIt should report back
bd21a6459ad33b8189782e4c904d99b3 rock-5b-spi-image-gbf47e81-20230607.img. - Ensure SPI flash is available:
ls /dev/mtdblock*should report back
/dev/mtdblock0. - Clear SPI flash with
sudo dd if=zero.img of=/dev/mtdblock0and verify.
- Write the bootloader to SPI flash:
sudo dd if=rock-5b-spi-image-gbf47e81-20230607.img of=/dev/mtdblock0and confirm with
sync.
- Download the latest bootloader:
Step 3: Installing Docker on Rock 5B
- Adding Docker’s GPG Key and Repository:
sudo apt-get update sudo apt-get install ca-certificates curl gnupg sudo install -m 0755 -d /etc/apt/keyrings curl -fsSL https://download.docker.com/linux/ubuntu/gpg | sudo gpg --dearmor -o /etc/apt/keyrings/docker.gpg sudo chmod a+r /etc/apt/keyrings/docker.gpg echo "deb [arch="$(dpkg --print-architecture)" signed-by=/etc/apt/keyrings/docker.gpg] https://download.docker.com/linux/ubuntu "$(. /etc/os-release && echo "$VERSION_CODENAME")" stable" | sudo tee /etc/apt/sources.list.d/docker.list > /dev/null sudo apt-get update - Installing Docker:
sudo apt-get install docker-ce docker-ce-cli containerd.io docker-buildx-plugin docker-compose-plugin - Configuring Docker Group and Services:
sudo groupadd docker
sudo usermod -aG docker $USER

sudo systemctl enable docker.service
sudo systemctl enable containerd.service
Step 4: Final Configurations
- Post-Boot Setup:
- Shutdown, remove SD, and restart to boot from SSD. Change keyboard layout.
- Update the system with
apt updateand
apt upgrade
- WiFi Configuration:
- For WiFi, reinstall
network-managerif necessary. - Enable and start
wpa_supplicant.service. - List WiFi networks with
nmcli dev wifi list
- For WiFi, reinstall
- Setting Up a Camera Stream with VLC:
- Install VLC with
sudo apt install vlcand
sudo apt install v4l-utils - Set up the camera stream:
cvlc v4l2:///dev/video1 --sout '#transcode{vcodec=mp4v}:std{access=http,mux=ts,dst=:8080}' -vvv - Access the stream on a host PC with
http://<ip-of-rock-5b>:8080
- Install VLC with
- Setup CPU Fan:
- Configure with
rsetupand selectpower_allocator. - Identify the fan index and activate it:
echo 3 | sudo tee /sys/class/thermal/cooling_device4/cur_state
- Configure with
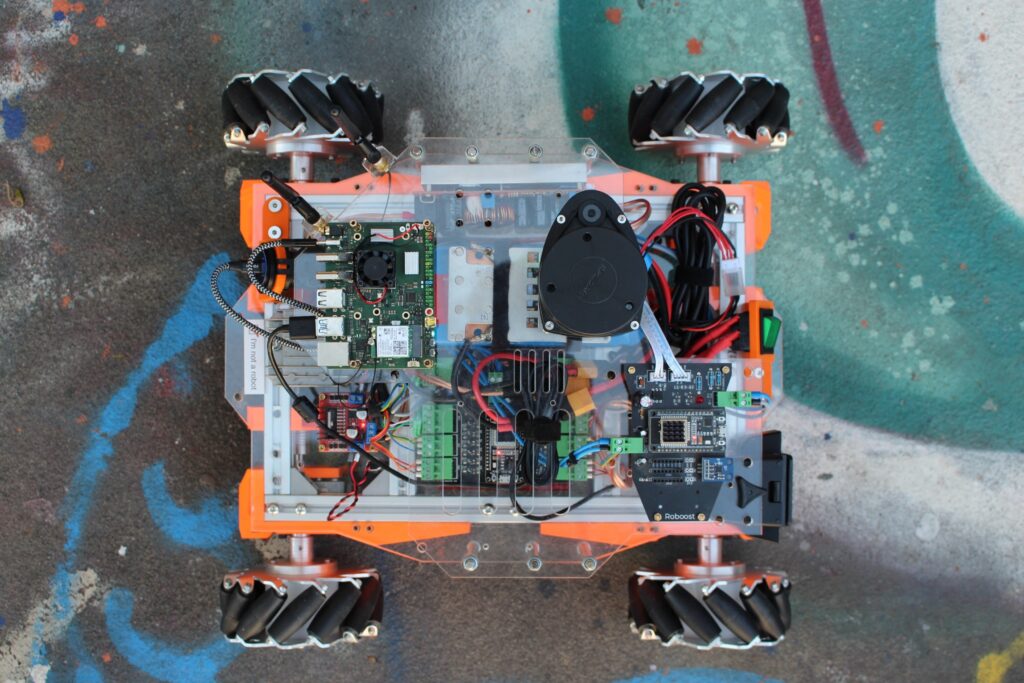
And with that we are ready to put the board on the robot. Here is a picture on how it looks on the Roboost-Mecanum bot:
Where to go from here
Now that the board is setup, we can use it to develop and deploy our robotics applications. In my case, I use it to run the Roboost-Cortex. Follow the instructions on the repos README for more information. A protective case for the board will soon follow!
If you have any questions or suggestions, please use the comment section! 🙂 Thanks for sticking around!
Could you expand a bit the steps in the “WiFi Configuration” section, please?
Hi, what problems did you run into?
For other versions of linux (e.g. ‘debian’) this code should work also (including ubuntu):
echo “deb [arch=”$(dpkg –print-architecture)” signed-by=/etc/apt/keyrings/docker.gpg] https://download.docker.com/linux/$(. /etc/os-release && echo “$ID”) “$(. /etc/os-release && echo “$VERSION_CODENAME”)” stable” | sudo tee /etc/apt/sources.list.d/docker.list > /dev/null